1. 通过脚手架创建项目
-
创建项目
vue init webpack tabbar -
选择配置
? Project name vuecli2test # 会根据这个名称创建一个文件夹,存放之后项目的内容该名称也会作为默认的项目名称,但是不能包含大写字母等 ? Project description description # 项目名称 , 不能有大写字母 ? Author renyi <2822930767@qq.com> # 作者信息 ? Vue build standalone # 后面介绍 ? Install vue-router? Yes # 路由 ? Use ESLint to lint your code? Yes # ESLint 代码规范检测, 根据自己需求 ? Pick an ESLint preset Standard ? Set up unit tests No # 单元测试 ? Setup e2e tests with Nightwatch? No # e2e测试,end to end安装Nightwatch,是一个利用selenium或 webdrivers或phantomis等进行自动化测试的框架 ? Should we run `npm install` for you after the project has been created? (recommended) npm # 选择npm 或 yarn
2. 项目搭建
-
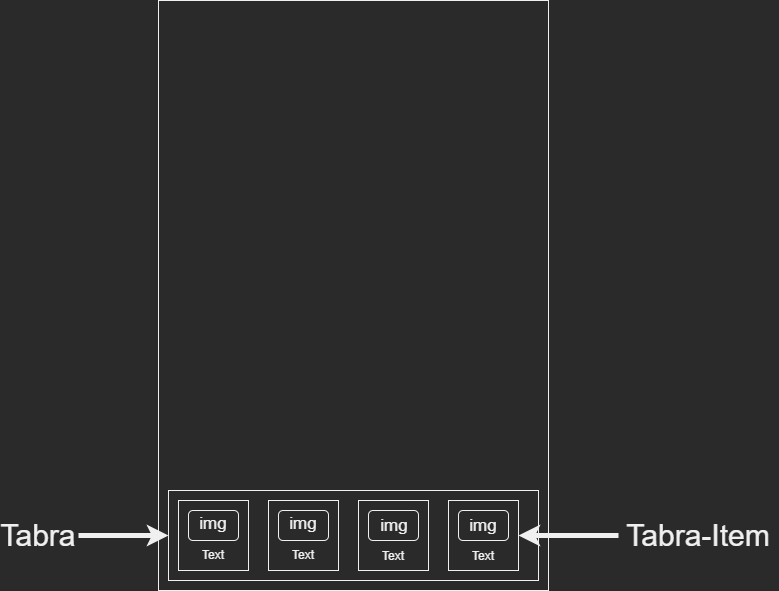
以下是项目框架 , 我们先将底部的导航抽取成一个 TaBra 组件 , 再将 其中的 4 个部分再抽取成一个 组件 Tabra-Item
-
1. 创建 TaBra.vue
<template> <div id="tab-bar"> <!--这里的插槽是给Tabra-Iteam准备的--> <slot></slot> </div> </template> <script> export default { name: "TabBar" } </script> <style scoped> #tab-bar{ display: flex; background-color: #f6f6f6; position: fixed; left: 0px; right: 0px; bottom: 0px; box-shadow: 0px -1px 1px rgba(144, 147, 145, 0.2); } </style> -
2. 抽取Tabra-Item
在组件中提供3个插槽 , 一个是未获取焦点的图片 , 一个是获取焦点后的图片 , 还有一个是文本
<template> <div class="tab-bar-item"> <slot name="item-icon"></slot> <slot name="item-icon-active"></slot> <slot name="item-text"></slot> </div> </template> <script> export default { name: "TabBarItem", } </script> <style scoped> .tab-bar-item{ flex: 1; text-align: center; height: 49px; } .tab-bar-item img{ height: 24px; width: 24px; } .activeText{ color: red; } </style> -
3. 在Vue.app中引用
使用tab-bar-item组件 , 通过父传子将 path 和 activetext 传递到子组件 , 因为此处是固定的 , 不是一个变量 , 所以可以不动态绑定
path: 跳转的路径
activeText: Tabra-Item 选中后的 text 颜色
在
<Tab-bar-item>传递2个图片 , 一个是选中的 , 一个是未选中的 , 可以通过具名插槽在 Tabra-Item 组件中通过v-if来判断显示哪一个<template> <div id="app"> <router-view></router-view> <!--使用tab-bar组件--> <tab-bar> <!--使用tab-bar-item组件 , 通过父传子将 path 和 activetext 传递到子组件 , 因为此处是固定的 , 不是一个变量 , 所以可以不动态绑定 path: 跳转的路径 activeText: Tabra-Item 选中后的 text 颜色 --> <tab-bar-item class="tab-bar-item" path="/home" activeText="red"> <!--传递2个图片 , 一个是选中的 , 一个是未选中的 , 可以通过具名插槽在Tabra-Item中通过v-if来判断显示哪一个--> <img class="" slot="item-icon" src="./assets/img/tabbar/home.svg"/> <img class="" slot="item-icon-active" src="./assets/img/tabbar/home_active.svg"/> <div slot="item-text">首页</div> </tab-bar-item> <tab-bar-item class="tab-bar-item" path="/category" activeText="red"> <img slot="item-icon" src="./assets/img/tabbar/category.svg"/> <img slot="item-icon-active" src="./assets/img/tabbar/category_active.svg"/> <div slot="item-text">分类</div> </tab-bar-item> <tab-bar-item class="tab-bar-item" path="/cart" activeText="red"> <img slot="item-icon" src="./assets/img/tabbar/cart.svg"/> <img slot="item-icon-active" src="./assets/img/tabbar/cart_active.svg"/> <div slot="item-text">购物车</div> </tab-bar-item> <tab-bar-item class="tab-bar-item" path="/profile" activeText="red"> <img slot="item-icon" src="./assets/img/tabbar/profile.svg"/> <img slot="item-icon-active" src="./assets/img/tabbar/profile_active.svg"/> <div slot="item-text">我的</div> </tab-bar-item> </tab-bar> </div> </template> <script> // 导入组件 import TabBar from './components/tabbar/TabBar' import TabBarItem from './components/tabbar/TabBarItem' export default { name: 'App', components: { //注册组件 TabBar, TabBarItem } } </script> <style> </style> -
4. 我们创建4个对应 Tabra-Item 的组件
创建4个组件 , 分别是home category cart profile , 通过路由进行跳转 , 既然需要跳转 , 那么就需要监听事件 , 我们在 Tabra-Item 中进行监听
我们通过
props属性获取第3步所传入的path属性, 通过调用this.$router.push(this.path);进行跳转我们通过
isActive函数来判断当前 Tabra-Item 是否处于选中状态 , 如果处于选中状态 , 我们就显示选中的图片也就是显示具名插槽item-icon-active
通过
setActiveText函数设置 文本颜色 我们在第3步时传入了一个文本颜色activeText我们可以用:style="setActiveText"动态绑定style的方式从setActiveText函数获取到css样式<template> <div class="tab-bar-item" @click="ItemClick"> <div v-if="!isActive"> <slot name="item-icon"></slot> </div> <div v-else> <slot name="item-icon-active"></slot> </div> <div :style="setActiveText"> <slot name="item-text"></slot> </div> </div> </template> <script> export default { name: "TabBarItem", props: { path : String, activeText:{ type: String, default(){ return "black" } } }, data(){ return { active: true } }, computed: { isActive() { // 将route中的 path 和当前的path进行匹配 return this.$route.path.indexOf(this.path) != -1 }, setActiveText() { // 如果处于激活状态 返回 color: this.activeText return this.isActive ? {color: this.activeText} : {color: "black"} } }, methods: { ItemClick() { this.$router.push(this.path); } } } </script> <style scoped> .tab-bar-item{ flex: 1; text-align: center; height: 49px; } .tab-bar-item img{ height: 24px; width: 24px; } .activeText{ color: red; } </style>
上一个:C ++中二进制矩阵的最短路径
热门文章
- 动物疫苗生产车间要求(动物疫苗生产车间要求是什么)
- springcloudalibaba架构(12):Feign整合Sentinel实现服务容错
- 3月29日|SSR/Shadowrocket/V2ray/Clash每天更新21.7M/S免费节点订阅链接,付费节点订阅推荐
- Java 垃圾回收超详细讲解记忆集和卡表_java
- 3月2日|SSR/Shadowrocket/Clash/V2ray每天更新18.8M/S免费节点订阅链接,付费节点订阅推荐
- 华畜兽药怎么样(华畜兽药是真的吗)
- 3月3日|V2ray/SSR/Clash/Shadowrocket每天更新19.4M/S免费节点订阅链接,付费节点订阅推荐
- 人打的狂犬和动物打的狂犬一样吗图片(人打的狂犬疫苗跟狗的一样吗?)
- 开宠物店利润大吗现在多少钱啊(开宠物店利润高吗)
- 3月22日|Clash/V2ray/Shadowrocket/SSR每天更新19.2M/S免费节点订阅链接,付费节点订阅推荐